
Each year, I end with a giveaway. This year, in addition to a shit ton of photos you can reverese engineer, I am including:
FREE TUTORIAL: AI Image Editing – Creating the Gen X Emoji
Each year, I end with a giveaway. This year, in addition to a shit ton of photos you can reverese engineer, I am including:
FREE TUTORIAL: AI Image Editing – Creating the Gen X Emoji
The Vision
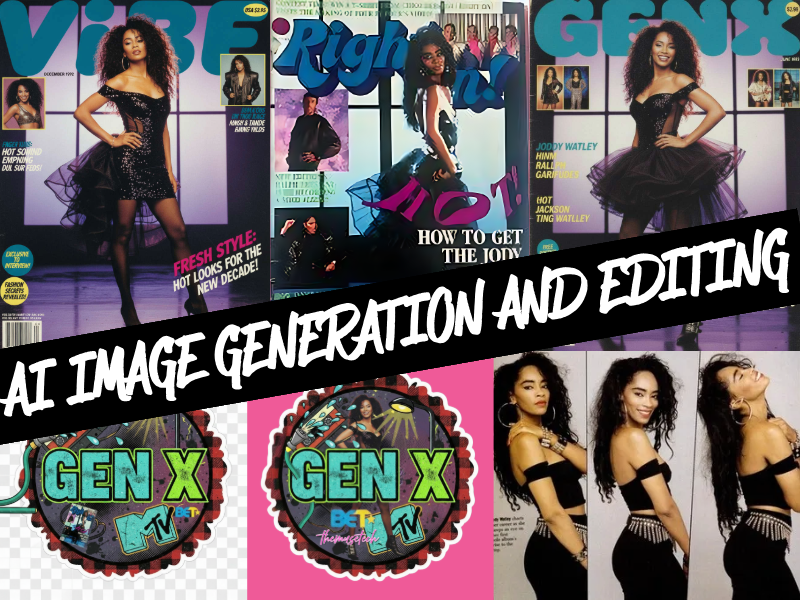
I wanted a Gen X emoji – something I could slap on every post as a warning label. Latchkey energy. Street lamp curfews. BET when it meant something. MTV when they played music. And center stage? Jody Watley. Not a generic figure – that energy specifically. The image in my head came from a Right On Magazine I personally owned. That poster was on my wall.
Step 1: Generate the Base Design
I started in Nano Banana and described everything I wanted in the sticker – the buffalo plaid border, the cassette tape, the boombox, street lamp, BET and MTV logos, Right On Magazine covers. AI gave me a solid first draft, but it generated elements bleeding outside the circle. Emojis need containment, so I moved to Adobe Express and Canva for manual cleanup. Trimmed the bleed, locked in the scalloped plaid border, transparent background secured.

Step 2: Restore the Reference Image (Failed)
For Jody Watley, I started with an image of the Right On Magazine photo. Took it to Galaxy.ai and tried the “restore” preset. Awful results. Don’t trust presets to do your thinking – they’re guessing, not seeing.
HORRIBLE!!!!

Original Image

Restore Attempt
Step 3: Generate with Intent
Switched back to Nano Banana. Instead of fighting the restore, I had the AI read the original image and generate a prompt based on what it saw. Critical move: I also attached a Jet Magazine cover as a facial reference. Without this, AI tends to make Black women mean-looking or whitewashed. You have to feed it what you want to see.
The result was strong but imperfect – wrong expression, wrong shoes. This is where iterative editing matters.
Step 4: Edit One Thing at a Time
Three fixes needed: title, dress, shoes, face and smile. Here’s the lesson – give AI one instruction at a time. Stack multiple edits and you increase confusion. First pass fixed the dress. Second pass fixed the shoes. Patience over speed.


Step 5: Background Removal (Tool Failure)
Now I needed her extracted for the sticker. Tried Galaxy.ai’s background removal preset and watched it destroy her left boot. The original background was dark, her shoes were black – too many similar pixels for the algorithm to separate cleanly. Preset tools read color values, not context. They don’t know “that’s a boot.”
Step 6: Switch Tools
When one tool fails, switch. Moved to Canva and used the magic background removal tools. Clean extraction. Both boots intact. Hair edges crisp. Even the semi-transparent tulle skirt separated properly. That’s the difference between a preset guessing and a tool that lets you direct.


Step 7: Final Assembly
Back to my layered sticker file. Dropped the extracted figure behind the “GEN X” text. Adjusted placement. Done.
The Lesson
AI generates. Humans direct. Tools fail – know when to switch. Your creative vision doesn’t come from the algorithm. It comes from you. The AI just helps you get there faster when your hands can’t do what your mind still sees.
Now go make something. And if it doesn’t work the first time? Try another tool. That’s not failure – that’s workflow.

A Note for Disabled Creators
I have bilateral carpal tunnel post-surgery and four severed cervical nerves. AI isn’t a shortcut for me – it’s accessibility. My first custom emoji was made in Microsoft Word 3.1, drilling down clipart to pixels, separating, recoloring, rejoining by hand. I had to – original clipart didn’t believe Black people used computers. Decades later, my hands can’t do what they used to, but my vision hasn’t changed. These tools let me keep creating. If that’s you too, know the door is open.
#genx #noapology #latchkeyenergy #nanobanana #galaxyai #adobeexpress #canva #themusetech


You must be logged in to post a comment.